System Requirements
To run Gridlight successfully you need the following specs. This applies to a single computer or the Grid Head (where all services are hosted).
| Spec | Minimum | Recommended |
|---|---|---|
| RAM | 32GB | 64GB |
| CPU | 8 cores | 12+ cores |
| GPU VRAM | 8GB (LLM only) | 12–16GB (models on GPU) |
| Disk | 30–50GB free (models + DBs) | 50GB+ (multiple models cached) |
For Grid Workers, you can go as low as 16GB of RAM, 4 cores with a small 2–3GB model.
What is GRIDLIGHT?
Gridlight is your personal AI powerhouse. It's a desktop application that lets you run large language models, generate images, and much more — all locally on your own hardware. No token limits. No data leaving your machine.
Think of it as having your own private AI lab. You download the models you want, fire up the app, and start creating. Whether you're a writer looking for a brainstorming partner, a designer generating concept art, or a developer building AI-powered apps — Gridlight puts the full power of modern AI at your fingertips.
Running AI locally means your data never leaves your machine. Your prompts, your documents, your creations — everything stays private. Plus, there are no per-token costs or rate limits. Use it as much as you want.
Get Your License
Before you can use Gridlight, you'll need a license. This is how we keep the lights on and the updates flowing. Head over to our licensing portal to create an account and pick a plan — or start with a free trial.
Create an Account
- 1
Visit the licensing portal
Go to license.gridlight.ai and click Register.
- 2
Fill in your details
Enter your email address, choose a password (8+ characters with at least one number or special character), and provide your name. Optionally add your company name.
- 3
Verify your email
Check your inbox for a verification email from Gridlight. Click the link to confirm your account. Once verified, you're ready to go.
After registering, we recommend enabling multi-factor authentication (MFA) in your account settings. It adds an extra layer of security using an authenticator app like Google Authenticator or 1Password.

Choose a Plan
Gridlight uses a simple, usage-based pricing model built around TFLOPs (Trillion Floating-Point Operations) — the unit of compute power for your AI workloads. Pick a tier based on how much compute you need, and pay per TFLOP.
| Tier | TFLOP Range | Best For |
|---|---|---|
| Individual | 1 – 10 | Solo creators, hobbyists, and experimenting |
| Individual | 11 – 100 | Power users and developers with larger models |
| Team | 101 – 500 | Small teams running shared workloads |
| SMB | 501 – 2,000 | Growing businesses with production AI needs |
| Enterprise | 2,001 – 5,000 | Large organizations with heavy compute demands |
| Enterprise+ | 5,001+ | Maximum scale deployments |
Choose yearly billing and save 5% on every tier. You can adjust your TFLOP count at checkout and change plans anytime from your billing dashboard.
For high-volume deployments, our sales team can put together a custom package with dedicated support. Contact sales to get started.
- 1
Select your plan
From the licensing portal, choose the plan that fits your needs. You can adjust your TFLOP allocation when checking out.
- 2
Complete checkout
You'll be taken to a secure Stripe checkout page to enter your payment details. Have a coupon code? Enter it at checkout for a discount.
- 3
Receive your license
Once payment is confirmed, your license is automatically created and ready to activate. You'll receive a confirmation email with your license details. You can also view and download your license from the portal dashboard at any time.
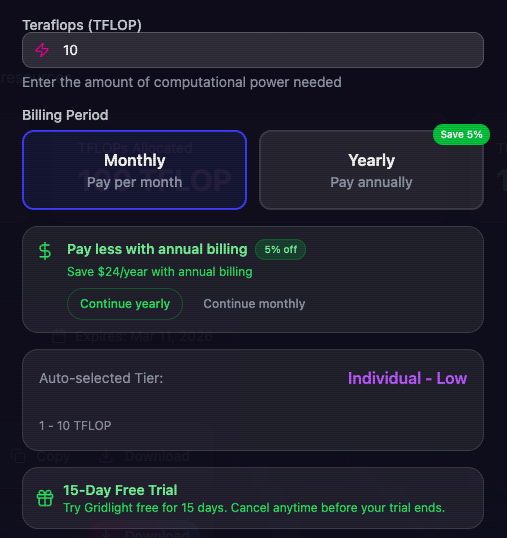
Start a Free Trial
Want to try before you buy? First-time customers get a 15-day free trial when purchasing a plan — just select a plan, enter your payment details, and your trial starts immediately. You won't be charged until the trial period ends.
During the trial you get full access to all Gridlight features at your selected TFLOP level. If it's not for you, cancel before the 15 days are up and you won't be charged a thing.
Your trial includes the same features as a paid plan. When it ends, simply purchase a license to keep going — all your models and settings stay in place.
Download & Install
Once you have your license, download Gridlight from the licensing portal. The app runs on macOS, Windows, and Linux — grab the right installer for your system.
macOS
- 1
Download the .dmg file
Log in to license.gridlight.ai and head to the Downloads section to grab the macOS installer. Both Intel and Apple Silicon (M1/M2/M3/M4) are supported. Requires macOS 12.0 or later.
- 2
Open the installer
Double-click the .dmg file and drag Gridlight into your Applications folder. The installer includes all required services (PostgreSQL, Qdrant, and Neo4j) bundled in — no external dependencies to install.
- 3
Launch Gridlight
Open Gridlight from your Applications folder. If macOS asks about an app from an unidentified developer, go to System Settings → Privacy & Security and click "Open Anyway." On first launch, Gridlight automatically sets up the bundled services — no Docker or manual configuration needed.
Windows
- 1
Download the installer
Log in to license.gridlight.ai and download the Windows installer from the Downloads section.
- 2
Run the installer
Double-click the .exe file and follow the setup wizard. Accept the license agreement and choose your install location. All required services are bundled in the installer — no Docker or manual database setup required.
- 3
Launch Gridlight
Find Gridlight in your Start menu and launch it. On first launch, Gridlight automatically provisions and starts all backend services.
Linux
- 1
Choose your package format
Gridlight is available as an AppImage (universal) and .deb (Debian/Ubuntu). Download from the licensing portal.
- 2
Install and run
AppImage: Make the file executable and double-click it.
bashchmod +x Gridlight-*.AppImage\n./Gridlight-*.AppImage.deb: Install via your package manager.
bashsudo dpkg -i gridlight-*.deb
Your First Launch
The first time you open Gridlight, you'll need to activate your license and log in before anything else. This is a one-time process — after that, Gridlight will remember your credentials.
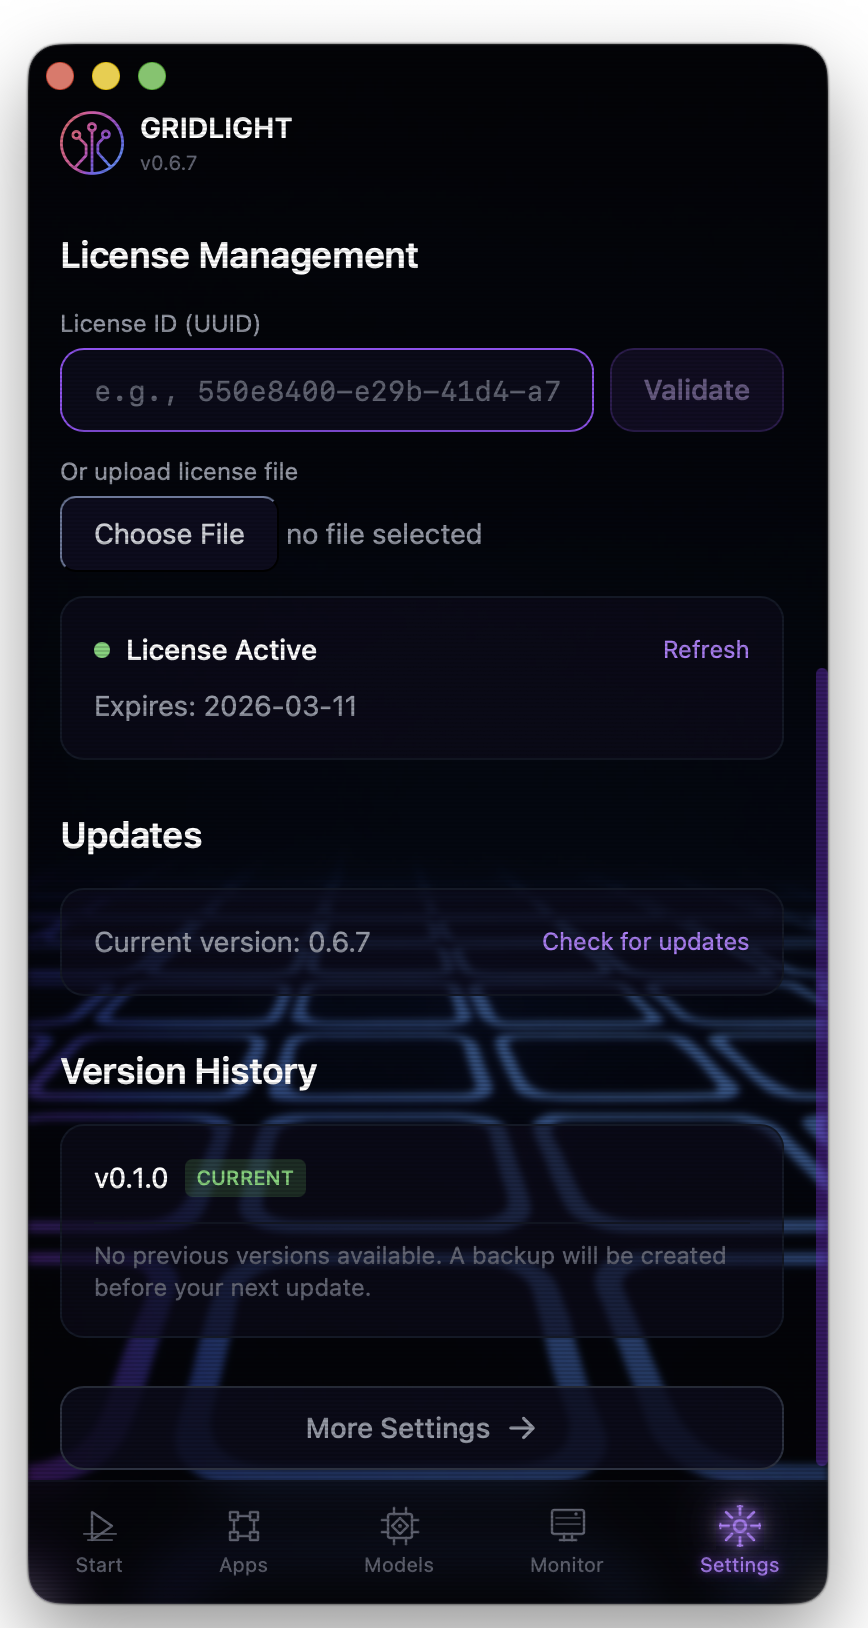
Activate Your License
This is the very first thing you'll do when you open Gridlight. Your license tells the app that you're a registered user and unlocks all of its features.
- 1
Open the Settings panel
When Gridlight launches for the first time, it will prompt you to enter your license information. Navigate to the Settings tab if you're not taken there automatically.
- 2
Enter your license
You can activate your license in two ways: enter your activation code (the
XXXX-XXXX-XXXX-XXXX-XXXXcode from your confirmation email), or upload the license file you downloaded from the licensing portal. - 3
Validate
Click Activate. Gridlight will verify your license with our servers and confirm that everything is in order. You'll see a green confirmation once your license is active.
Gridlight requires a valid license to operate. Without activating your license, you won't be able to use any of the app's features. Make sure you have your activation code or license file handy before launching for the first time.
Log In
After your license is activated, you'll need to log in with the same account you created on the licensing portal. This connects your desktop app to your license and ensures your TFLOP allocation and settings are synced.
- 1
Enter your credentials
Type in the email and password you used when registering at license.gridlight.ai.
- 2
Complete MFA (if enabled)
If you've set up multi-factor authentication, enter the code from your authenticator app when prompted.
- 3
You're in!
Once logged in, Gridlight is fully operational. Your license status, TFLOP allocation, and account details are synced automatically.
Gridlight keeps you logged in between sessions. You won't need to enter your credentials every time you open the app — only on the first launch or if you explicitly log out.
Setup Wizard
With your license active and your account logged in, the setup wizard kicks in to configure Gridlight for your system. No technical expertise needed — just follow along.
- 1
System check
Gridlight checks your system to make sure everything's ready. It'll verify your OS, available RAM, and GPU (if you have one). Don't worry if you don't have a GPU — Gridlight works great on CPU too, just a bit slower for large models.
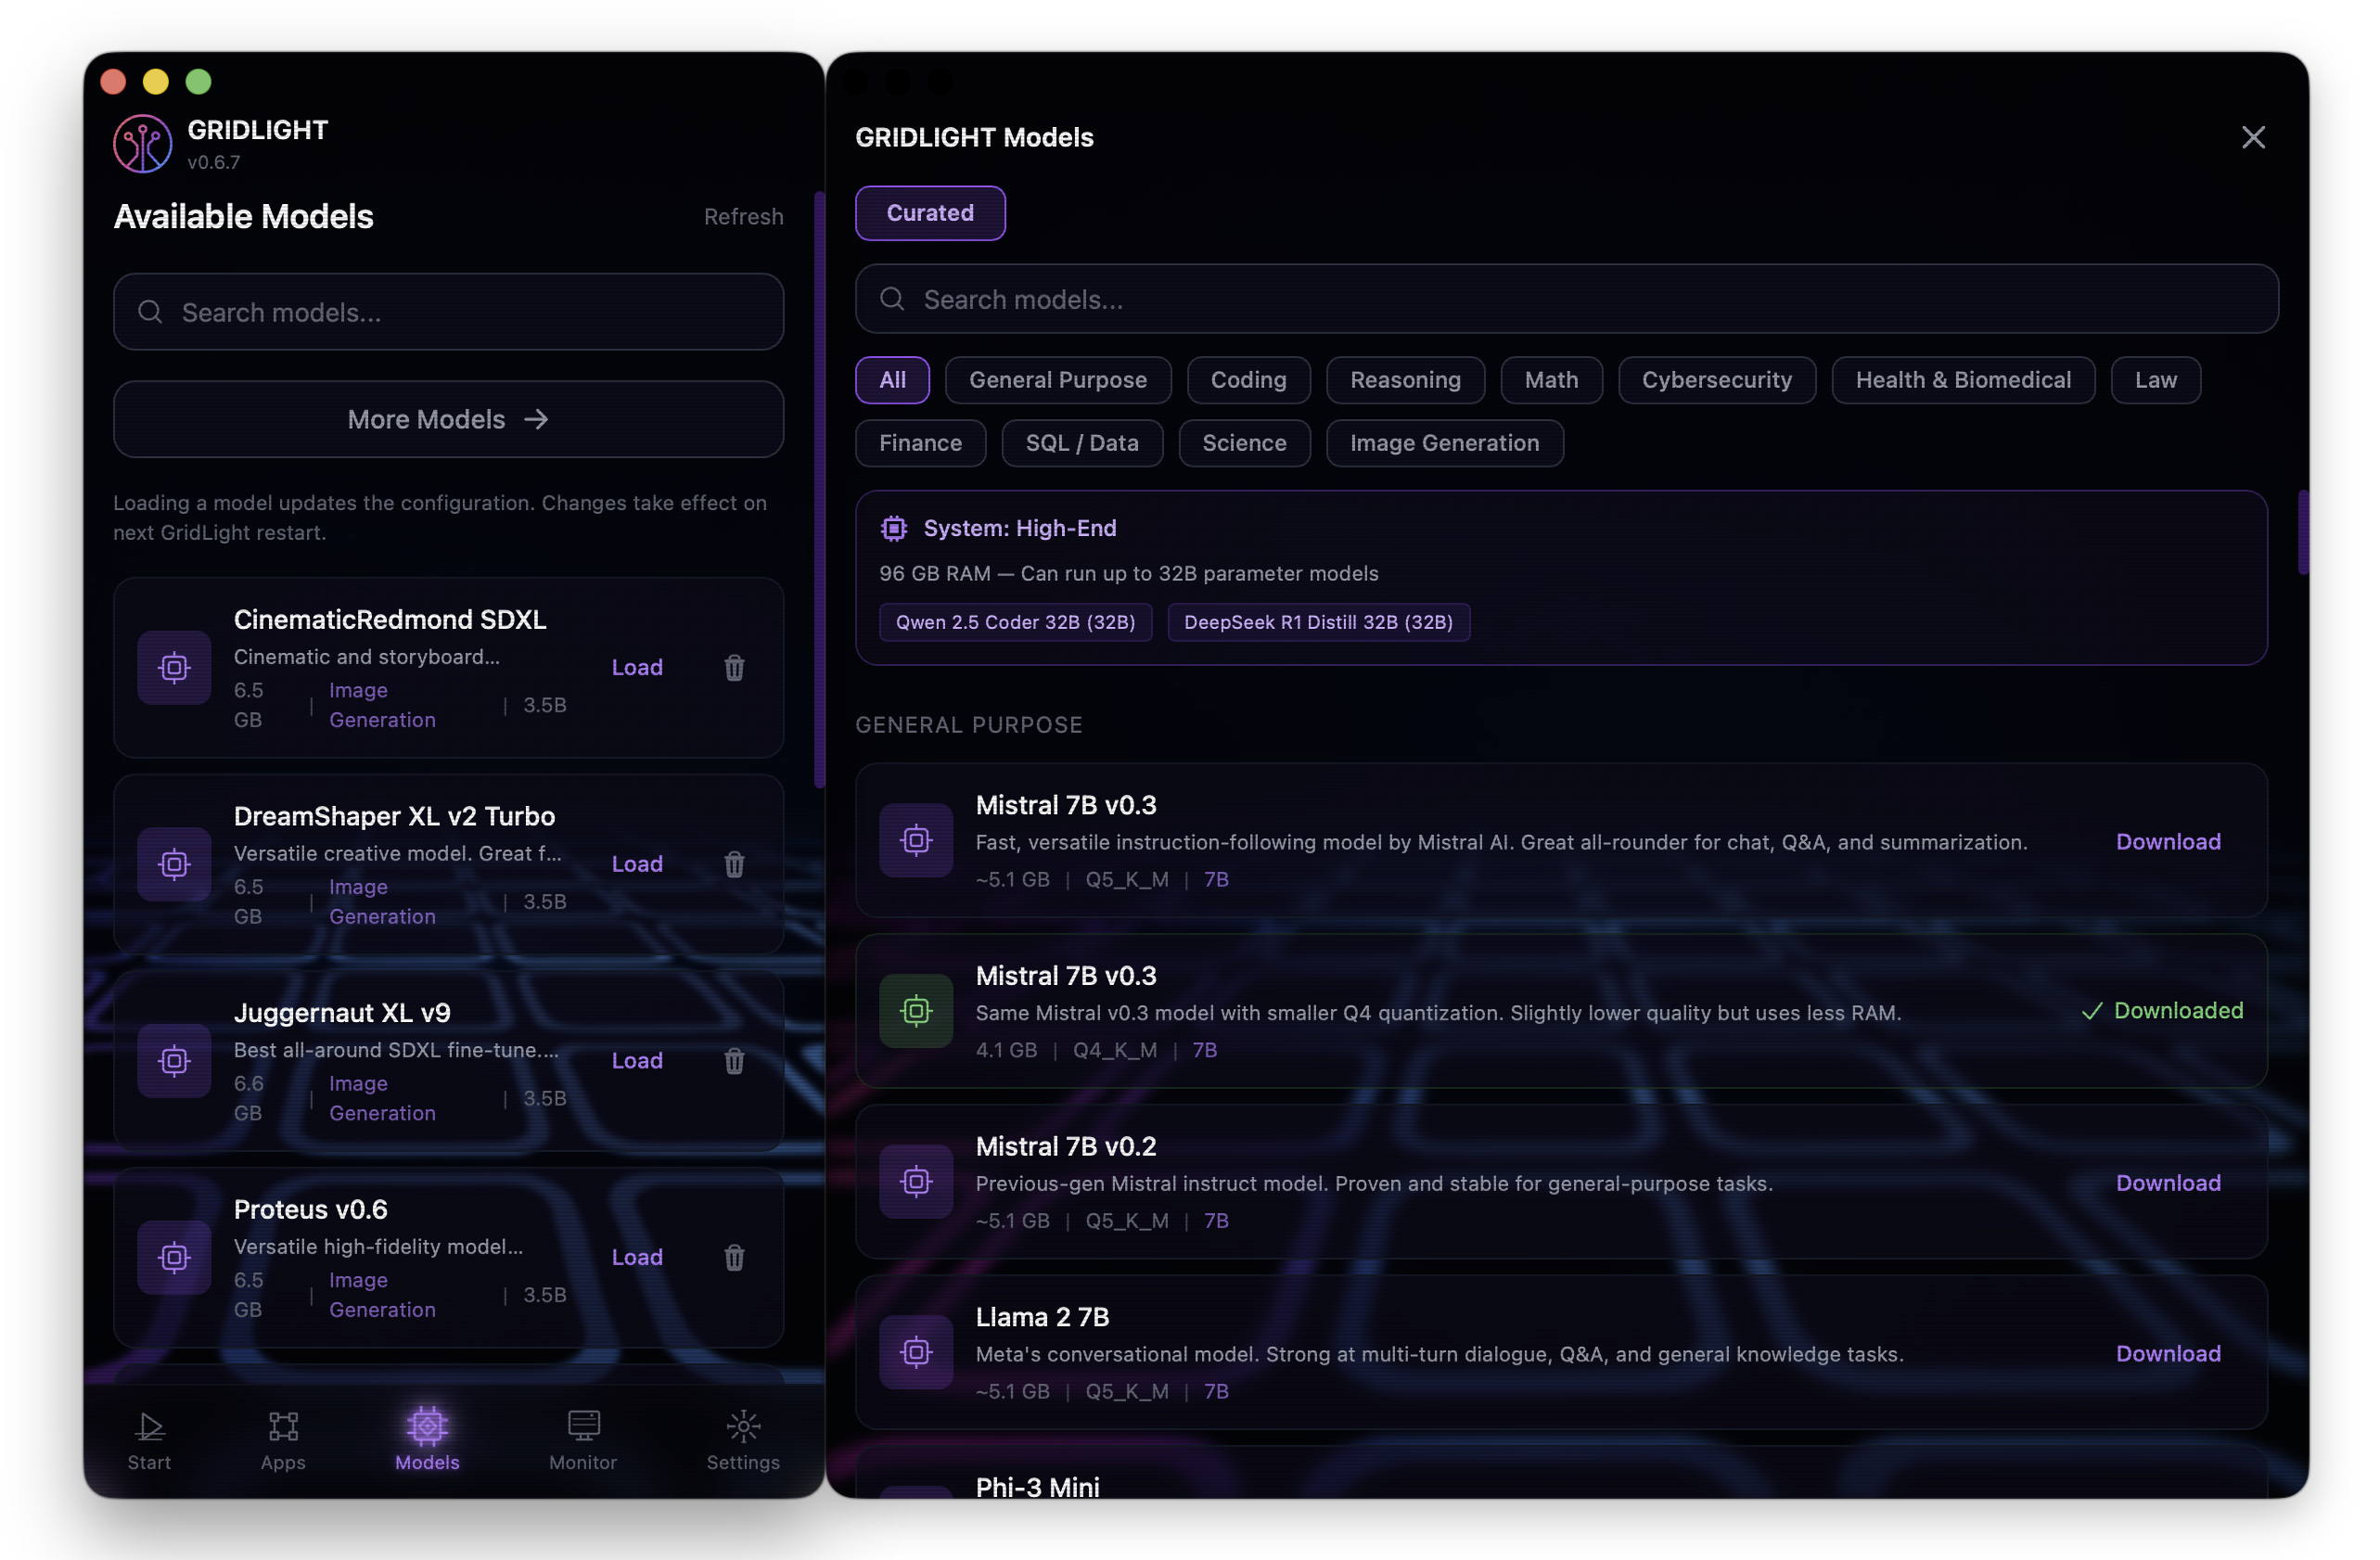
Download Your First AI Model
To chat with AI or generate content, you'll need at least one model installed. Gridlight makes this easy with a curated catalog of tested, ready-to-go models — or you can import from HuggingFace's massive library.
Gridlight can start and run without any models installed — all core services (database, vector search, gateway) will launch normally. You can download models at any time from the Models tab.
Head to the Models tab in the app. You'll see a curated catalog of 59+ models organized by category:
- General Purpose — Mistral, Llama, Phi, OpenHermes, Falcon
- Coding — Qwen Coder, DeepSeek Coder, Code Llama
- Reasoning — DeepSeek R1, math-specialized models
- Creative — Image generation (Stable Diffusion XL variants)
- Specialized — Cybersecurity, health, law, finance, SQL, science
Each model shows its size, parameter count, and recommended system specs. Click Download and watch the progress bar. Most models are 4–8 GB.
For general chat, try Mistral 7B or Llama 2 7B Chat. They're fast, capable, and work well even on modest hardware. If you have 32GB+ RAM, the 13B and 32B models deliver noticeably better results.
Want something specific? Use the HuggingFace search to browse 50,000+ models. Search by name, filter by type, and download specific quantizations (Q4, Q5, Q8) depending on your available memory.
HuggingFace models must be in GGUF format for LLMs or SafeTensors for image models. The search filters automatically to compatible formats.
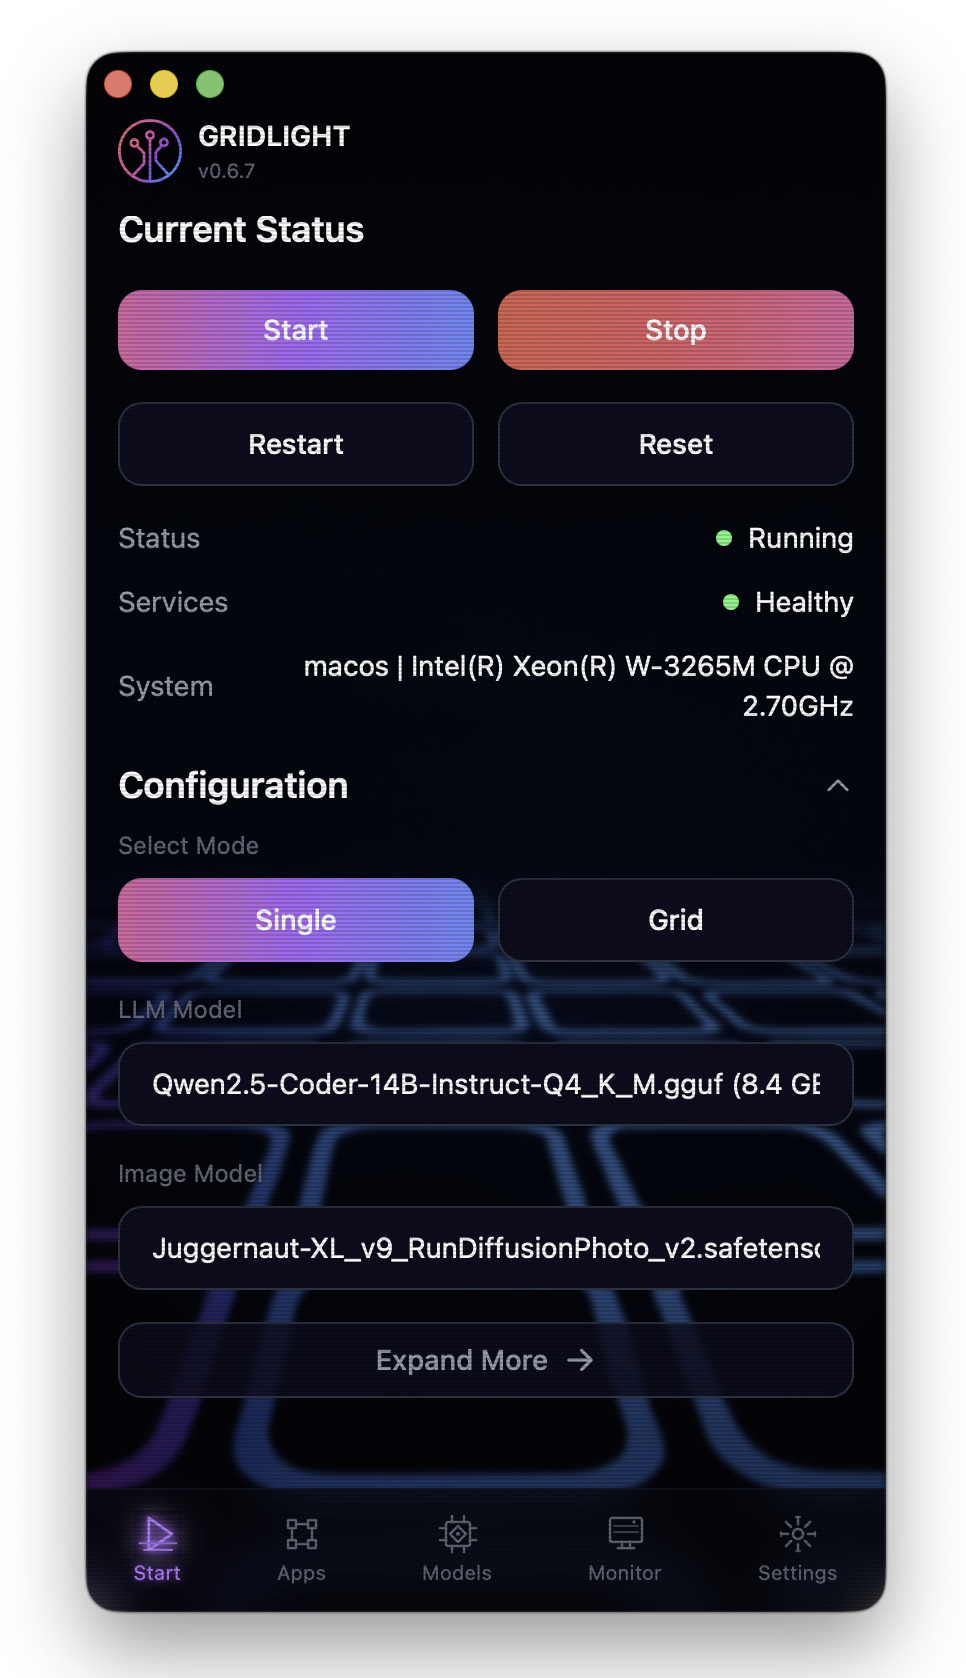
Choose Deployment Mode
Gridlight gives you two options:
- Single Node — Everything runs on your machine. This is what most people choose and is the simplest to set up.
- Grid Mode — Spread AI workloads across multiple machines. Great for teams or if you have several computers you want to pool together. You'll pick a "head node" (the coordinator) and "worker nodes" (the muscle).
If you're just getting started, go with Single Node. You can always switch to Grid Mode later. Note that Grid Mode may require additional gateways on your license depending on your plan.
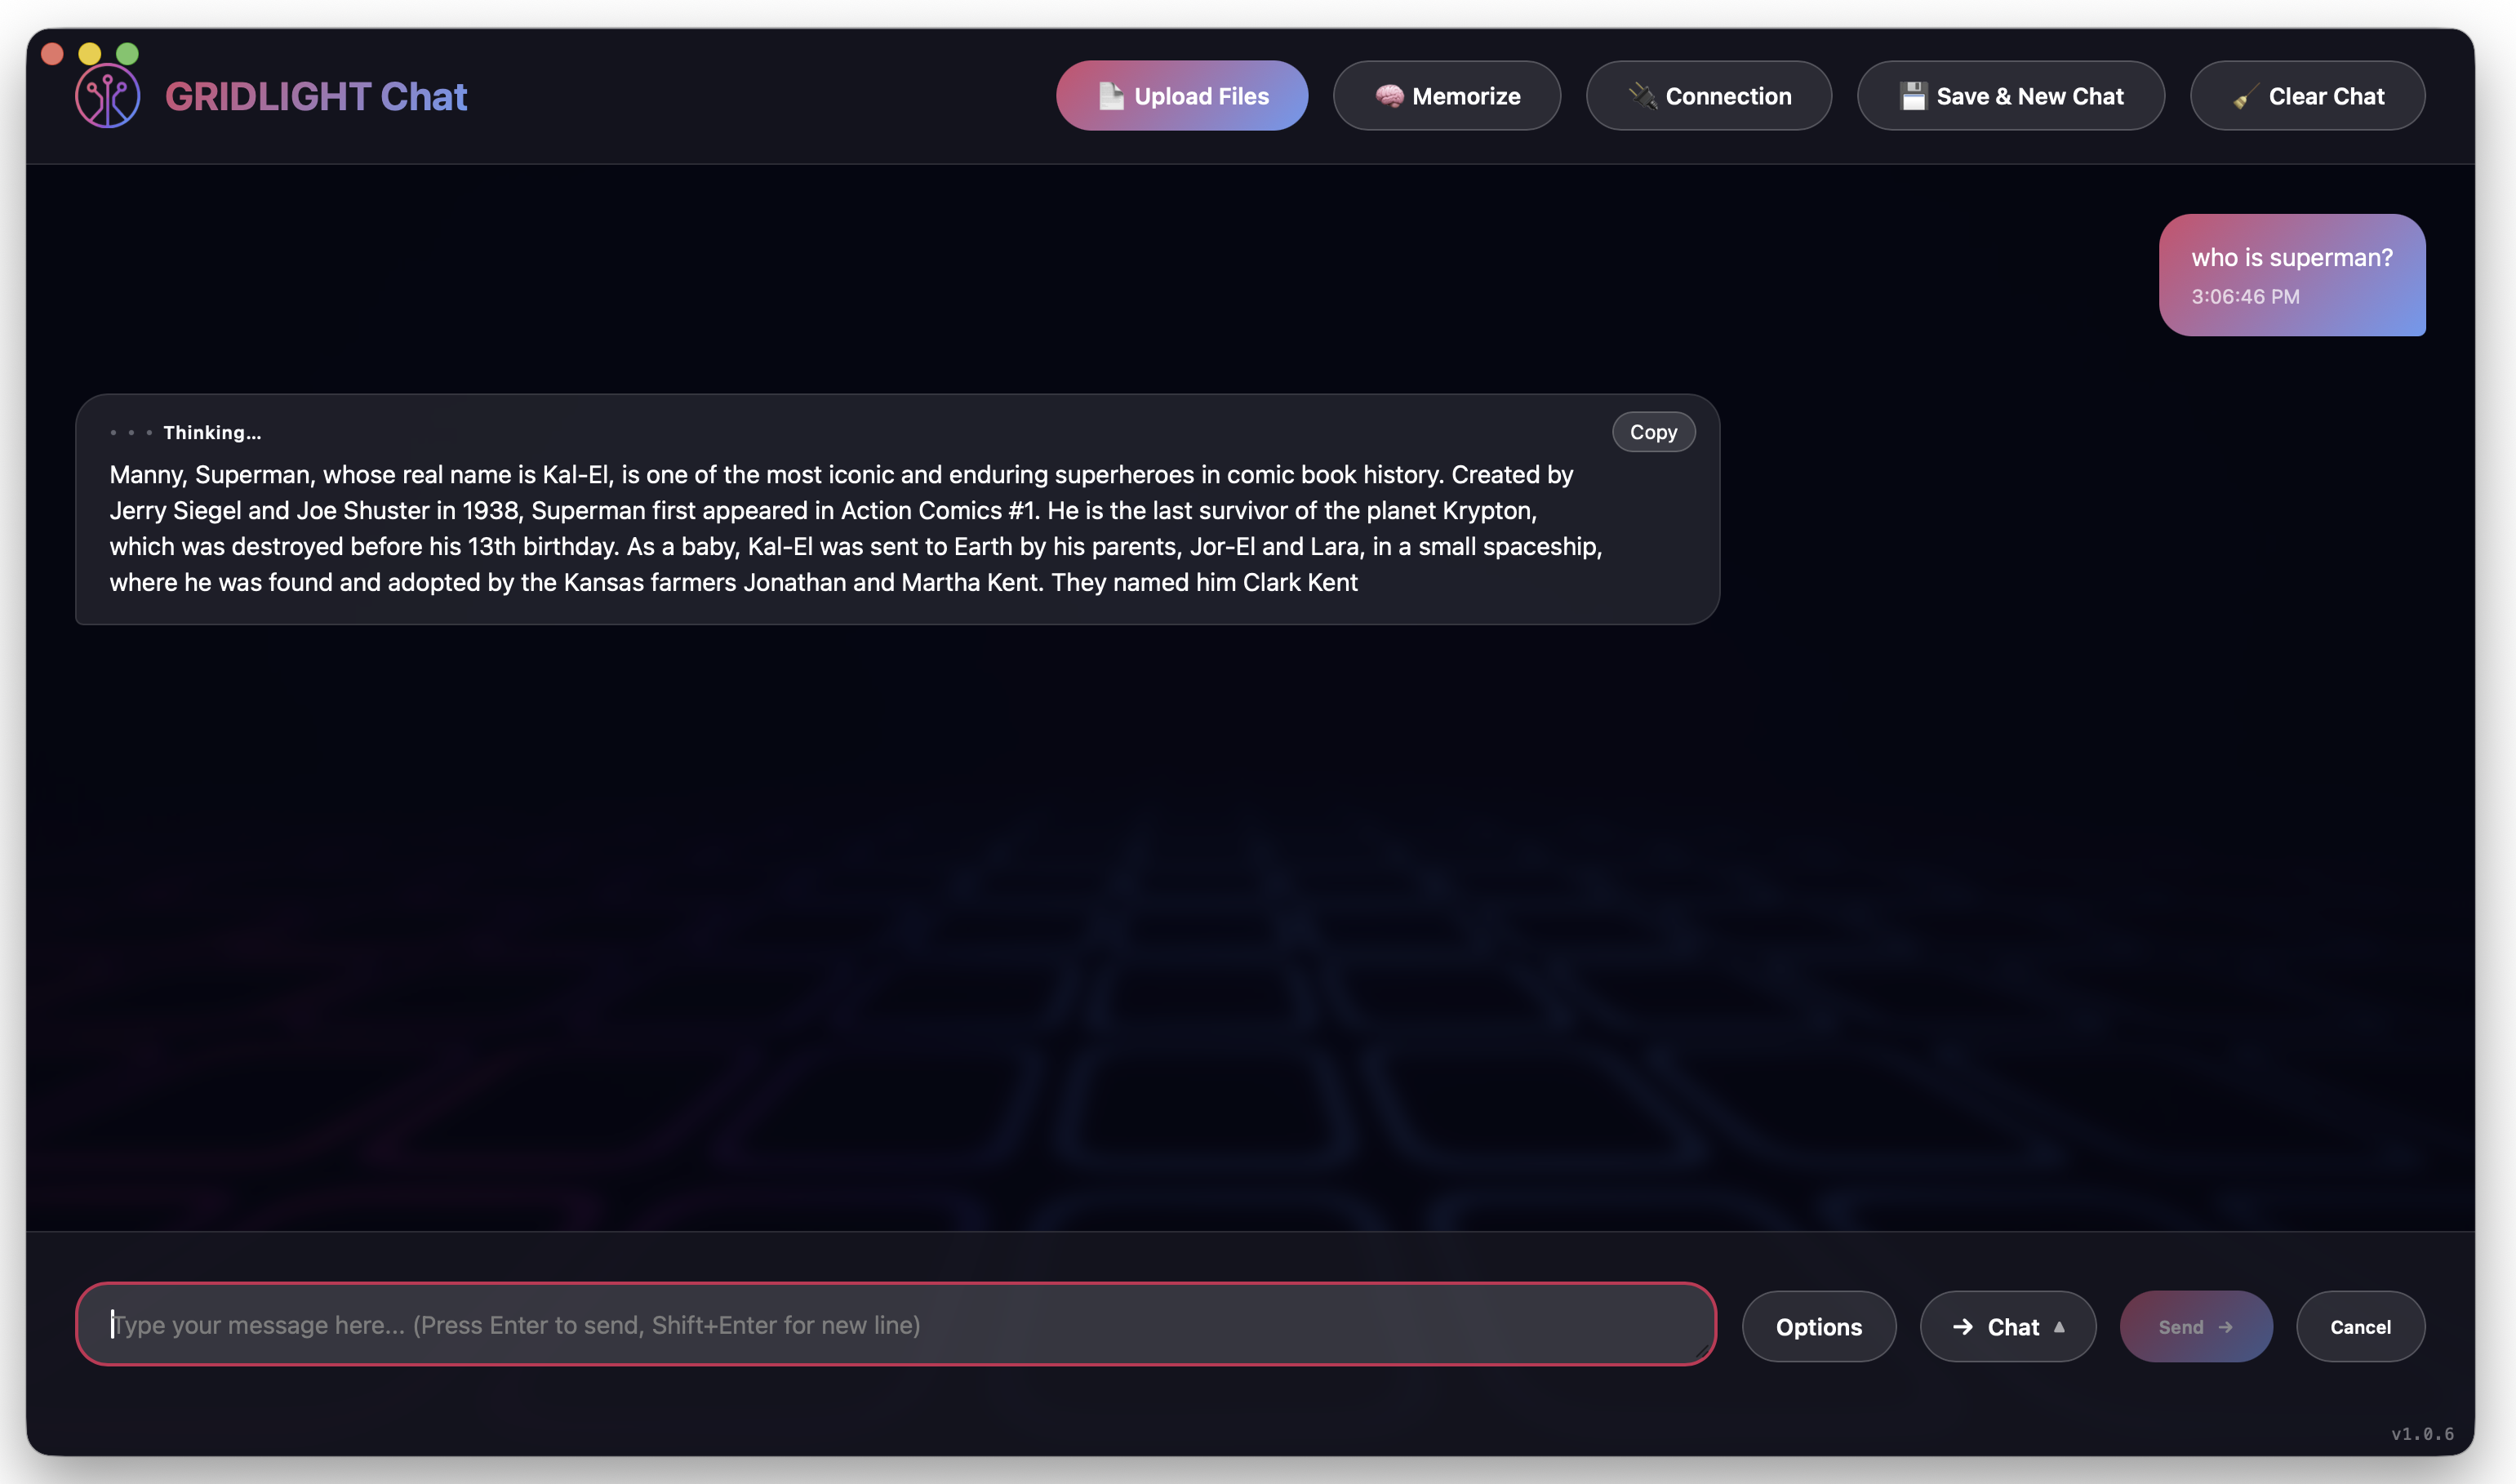
Chat with AI
Once you have a model installed and your services are running, you're ready to chat. Gridlight's chat is powered by a sophisticated RAG (Retrieval-Augmented Generation) pipeline — which is a fancy way of saying it can reference your documents and data to give you smarter, more contextual answers.
- 1
Open an app with chat
Head to the Apps tab and launch a chat application. Gridlight comes with built-in chat apps, or you can install more from the Marketplace.
- 2
Type your question
Ask anything! The AI will respond using the active model. You'll see streaming responses appear in real time.
- 3
Upload documents (optional)
Want the AI to reference specific information? Upload documents (PDF, Word, text files, spreadsheets, code files) through the chat interface. Gridlight will chunk, embed, and index them so the AI can cite your own data in its answers.
Chat understands slash commands for quick actions — you don't have to leave the conversation:
/image— generate an image (e.g./image a sunset over a cyberpunk city)/search— force a one-off search of your documents for this message/report,/document,/spreadsheet— generate a PDF, Word doc, or Excel file (prefix withdetailed:orbrief:to control length)/flowchart,/diagram,/chart— create a diagram from a description/remember,/memories,/forget— manage what Gridlight remembers
Generate Images
Gridlight supports local image generation using Stable Diffusion XL models. Create stunning artwork, concept designs, product mockups — anything you can describe.
Text to Image
The simplest way to create images. Describe what you want, and the AI generates it.
- 1
Make sure you have an image model
Go to the Models tab and download an image model if you haven't already. We recommend DreamShaper XL Turbo for fast results or Juggernaut XL for photorealistic output.
- 2
Open an image generation app or use the /image command
You can use a dedicated image app from the marketplace, or type
/image your prompt herein any chat. - 3
Write your prompt
Be descriptive! Include details about style, lighting, composition, and mood. The more specific you are, the better the results.
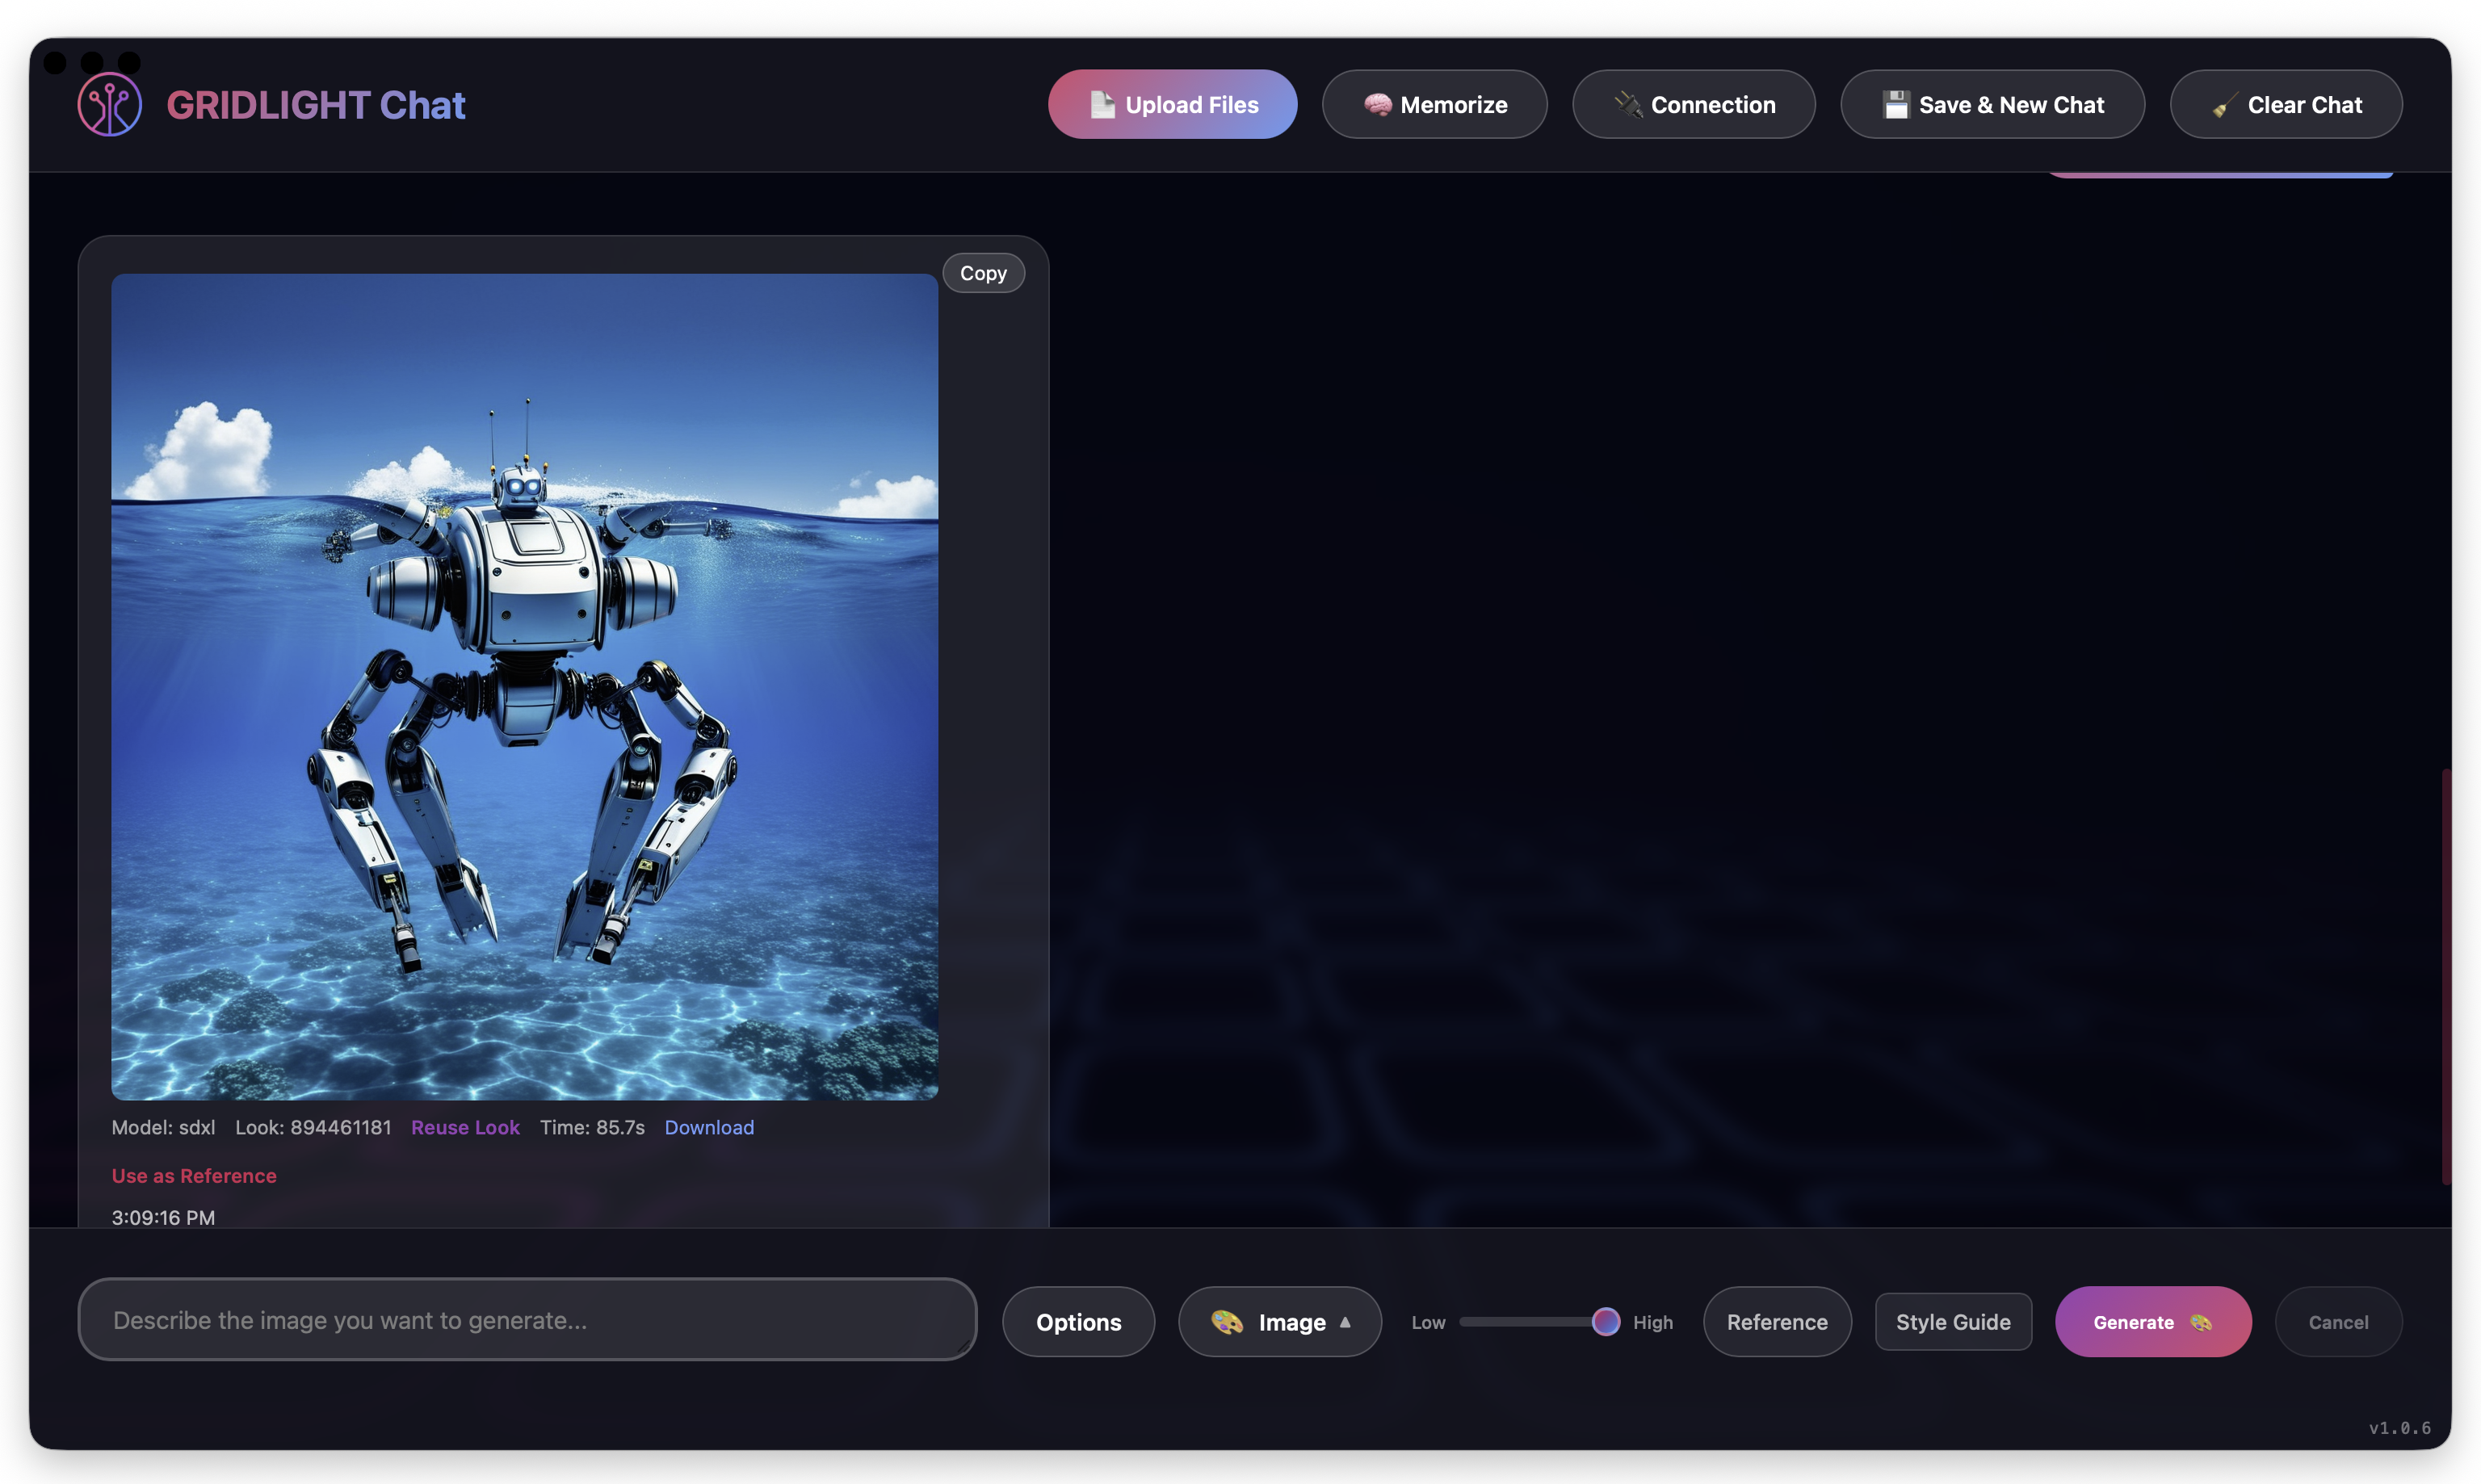
Image to Image
Already have an image you want to transform? Upload a base image and describe the changes you want. The AI will modify it while preserving the overall composition — perfect for style transfers, color adjustments, or adding new elements.
Inpainting
Want to edit just part of an image? With inpainting, you mask the area you want to change and describe what should replace it. Remove unwanted objects, add new elements, or fix imperfections — all while keeping the rest of the image untouched.
Generate Video
Gridlight can generate short video clips locally from a text prompt or a reference image, using models like CogVideoX, Wan, and Mochi. Video runs entirely on your own hardware — no clips ever leave your machine.
Video generation ships behind a feature flag and is one of the most compute-intensive things Gridlight does. If your build doesn't include it, chat will tell you "Video generation is not enabled in this build." You'll also want a capable GPU — video is far heavier than image generation.
Text to Video
- 1
Download a video model
Open the Models tab and download a video model (e.g. CogVideoX). You can also set your default video model in the Start tab's configuration.
- 2
Switch chat to Video mode
In Gridlight Chat, switch to Video mode (Gridlight also auto-detects video intent from natural phrasing like "make a video of…").
- 3
Describe your clip and set options
Type your prompt and adjust the generation options — resolution (e.g. 1280×720), frame rate (fps), and duration (seconds). Then send. Progress streams live as the clip renders.
Image to Video
To animate a still, attach a reference image before generating. Gridlight uses it as the starting frame (image-to-video) so the motion builds from your picture instead of a pure text description — great for bringing product shots or concept art to life.
Keep durations short (a few seconds) while you dial in your prompt. Longer clips and higher resolutions multiply render time and VRAM use quickly.
Voice & Speech
Gridlight includes local text-to-speech and speech-to-text, so you can talk to your AI and have it talk back — all offline. Voice features live in Gridlight Chat's Options panel and the desktop app's Features panel.
Voice to Text (Speech Recognition)
- 1
Click the mic button
In the chat input bar, click the mic button (🎤). Wait for the red indicator, then speak.
- 2
Stop to send
Click the mic again to stop. Your speech is transcribed and the message is sent automatically.
- 3
Hands-free with a wake word
Enable Wake on "Hey Gridlight" in the Features panel for hands-free activation, or use push-to-talk for quick dictation.
Text to Voice (Read Aloud)
Open Options in chat and enable Text to Voice under the Voice section. Choose a voice and adjust the volume — Gridlight will read every response aloud as it streams. Browse installed voices from the voice picker; more voice models can be downloaded from the Models tab.
Voice Cloning
Want the AI to speak in a specific voice? Use the voice cloningrecorder in the desktop Features panel to capture a short sample and create a custom voice, then select it as your Text-to-Voice output. Everything is processed locally.
Voice support varies by platform and hardware. On Intel Macs, Gridlight falls back to an on-device CPU TTS engine, so some advanced voice options may be unavailable.
Marketplace Apps
The Gridlight Marketplace is where you discover ready-to-use AI applications built by the community and our team. Browse by category — project templates, automations, creative tools, productivity apps — and install with one click.
- 1
Browse the marketplace
Visit market.gridlight.ai or open the Apps tab in the desktop app. Search, filter, and sort by category, rating, or popularity.
- 2
Install an app
Click Download on any free app, or purchase paid apps via secure Stripe checkout. Apps are automatically installed to your local Gridlight installation.
- 3
Launch and use
Installed apps appear in your Apps tab. Click to launch — they run directly in Gridlight, powered by your local AI models.
Rate and review apps to help the community discover the best tools. Your feedback helps developers improve their apps too!

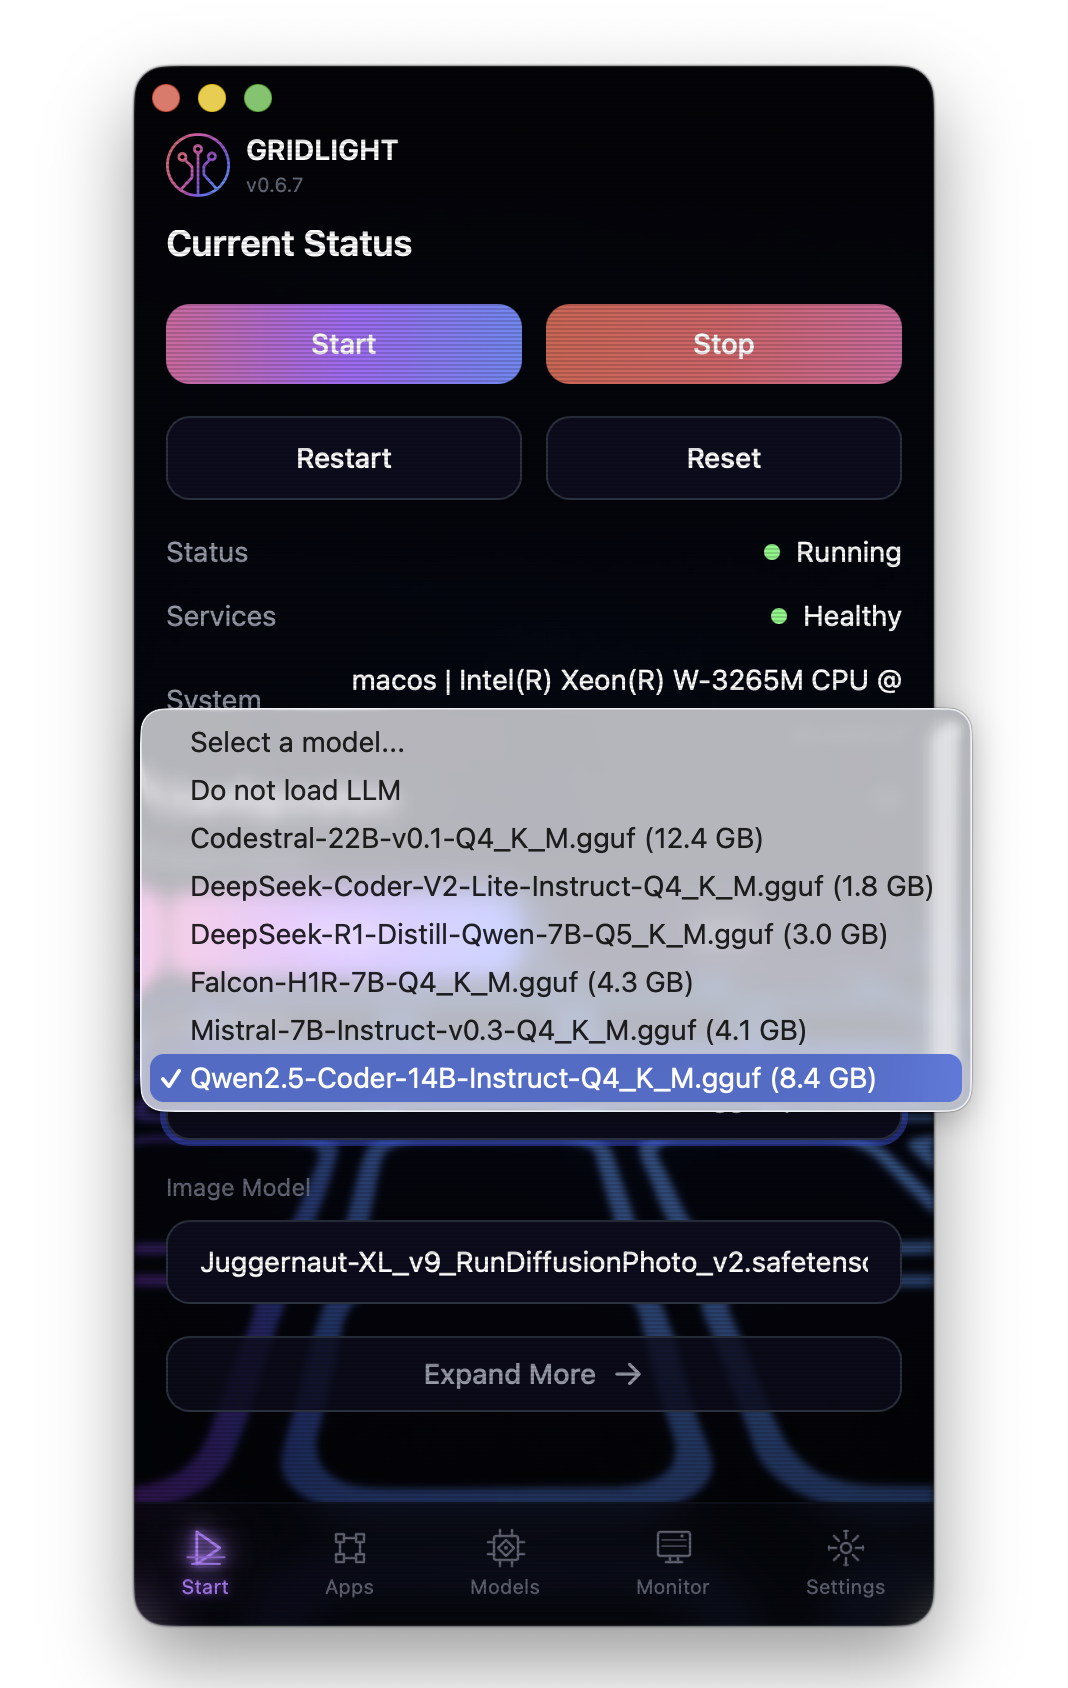
Manage Models
You can have multiple models installed and switch between them depending on what you're doing. Writing code? Switch to a coding model. Generating images? Make sure an image model is active.
- Switch active model — Open the Models tab and select which LLM, embedding, or image model is active
- Download more models — Add models at any time from the catalog or HuggingFace
- Quantization options — Choose between Q4 (faster, less memory), Q5 (balanced), or Q8 (highest quality) for each model
- Delete models — Remove models you no longer need to free up disk space
Monitor & Performance
The Monitor tab is your live window into what Gridlight is doing. It shows how much compute you're using in real time, whether every service is healthy, and lets you capture diagnostic snapshots when you need help.
TFLOPS Gauge
At the top of the Monitor tab is a live TFLOPS speedometer that updates every couple of seconds. It shows current demand (compute reserved by in-flight requests) against your available capacity — so you can watch it spike during an image or video generation and settle back when idle.
- Avg TFLOPs — your rolling average compute usage
- Hardware TFLOP Potential — what your machine (or Grid cluster) can deliver
- Agents — each inference agent (LLM, embedding, image, voice, video…) and the TFLOPs it reports, aggregated across every node in Grid Mode
The TFLOPS gauge is the fastest way to confirm a Grid Worker actually joined: when a worker comes online, its agents appear in the list and the cluster's total potential climbs.
Service Health & Vitals
Service Health lists every backend service — Gateway, LLM, embedding, image, voice, video agents, plus the databases (PostgreSQL, Qdrant, Neo4j) — with a status indicator for each. Below it, System Vitals shows live hardware telemetry (CPU, memory, and more). If something shows as stopped or partial, this is where you'll spot it first.
Diagnostics & Support
When you need help, capture a diagnostic snapshot from the Monitor tab. Give it a name, choose which categories to include, and either save it locally or send it to Gridlight support. You stay in control of exactly what's shared:
- System Info
- TFLOP Metrics
- Agent Info
- Performance
- Activity Log
- License State
Nothing is transmitted unless you choose Send to support, and only the categories you tick are included. "Save locally" keeps the snapshot on your device.
Manage Your License
Your license is the key to Gridlight. Here's everything you need to know about keeping it active, checking your usage, and managing billing.
License Dashboard
Log in to license.gridlight.ai to access your license dashboard. Here you can:
- View license status — See whether your license is active, in a grace period, or expired
- Check expiration date — Know exactly when your license renews or expires
- View TFLOP allocation — See your total compute ceiling and how it's distributed
- Download license file — Grab a fresh copy of your license file for offline activation
- Manage gateways — See which machines are registered under your license

Billing & Payments
All billing is handled securely through Stripe. From your licensing portal you can:
- View billing history — See all past invoices and payments
- Update payment method — Change your credit card or payment details via the Stripe customer portal
- Purchase additional TFLOPs — Need more compute power? Add TFLOPs to your existing plan anytime (prorated to your billing cycle)
- Apply coupon codes — Got a discount code? Apply it during checkout or plan upgrade
- Update billing address — Keep your invoice details current
Renewal & Expiration
Here's what happens as your license approaches its renewal date:
| Timeline | What Happens |
|---|---|
| Before expiration | You'll receive an email reminder a few days before your license expires so you have time to renew |
| Expiration date | Your license enters a 7-day grace period — Gridlight continues working normally while you sort out renewal |
| Grace period ends | If not renewed, your license expires and Gridlight's features become unavailable. Your models, settings, and data are preserved — just renew to pick up where you left off |
Don't worry about losing your work if your license lapses. All your models, documents, app data, and settings stay on your machine. Just renew your license and everything is back to normal instantly.
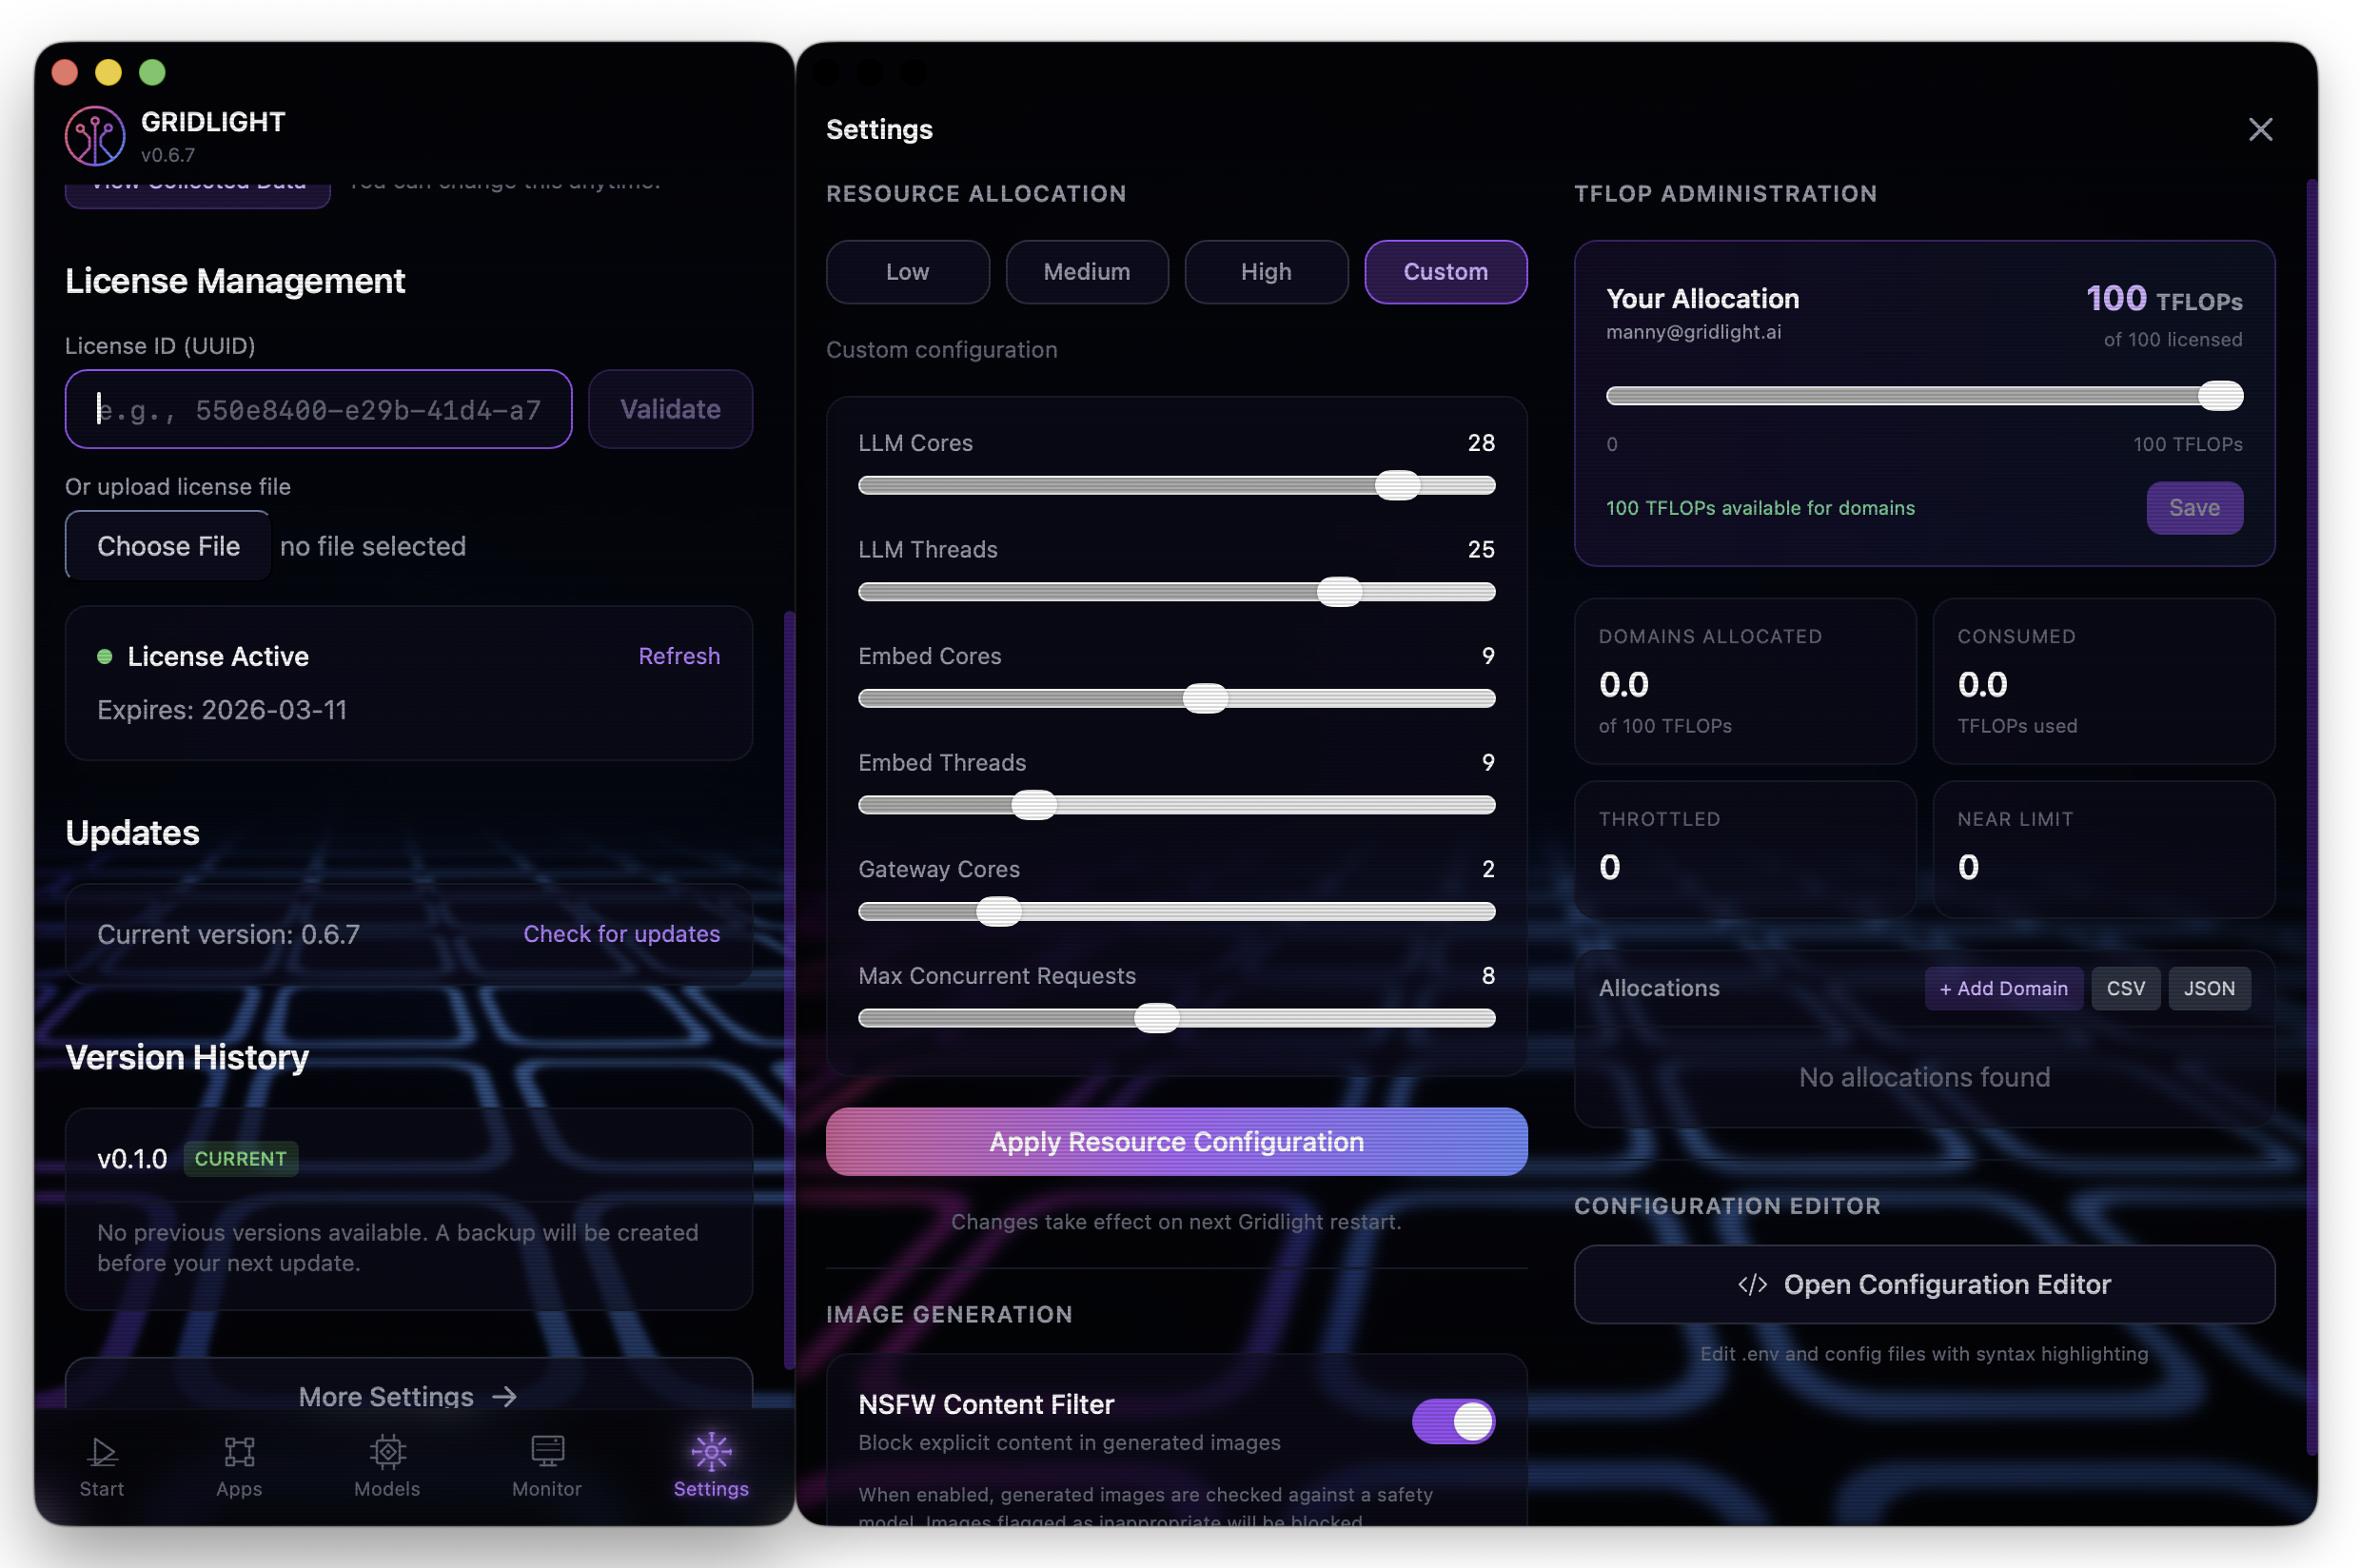
TFLOP Allocation
TFLOPs (Trillion Floating-Point Operations) are the unit of compute power in your Gridlight license. Your plan comes with a set TFLOP ceiling that determines how much AI processing you can do.
- Single machine — Your full TFLOP allocation goes to your one gateway
- Grid Mode — Distribute TFLOPs across multiple gateways (e.g., 500 to your workstation, 500 to a server)
- Reallocate anytime — Shift TFLOPs between gateways as your needs change
- Monitor usage — Track real-time TFLOP consumption in the desktop app's Monitor tab
If you're consistently hitting your allocation ceiling, consider upgrading your plan or purchasing additional TFLOPs from the billing dashboard.
Settings & Configuration
Gridlight's desktop app is organized into tabs across the bottom navigation bar. Here's what each tab does:
Navigation Tabs
| Tab | What it does |
|---|---|
| Start | Quick-start guide, onboarding, and status summary |
| Apps | Marketplace app discovery, installation, and management. Downloads are verified with SHA-256 checksums for security. |
| Models | Browse, download, and manage AI models. Switch active LLM, embedding, and image models. |
| Monitor | Real-time TFLOP usage gauge, service health, performance stats, activity log, and diagnostics (log viewer, service logs, system info) |
| Settings | License, account, gateway URL, API token, CPU threads, and TFLOP allocation |
Key Settings
| Setting | What it does |
|---|---|
| License | View your license status, activation code, and expiration. Re-activate or update your license here. |
| Account | Your logged-in account details. Log out or switch accounts if needed. |
| Gateway URL | The local API endpoint (default: http://localhost:8080) |
| API Token | Authentication token for local API access |
| CPU Threads | How many CPU threads to dedicate to inference, embedding, and reranking |
| TFLOP Allocation | View and manage compute quotas across gateways |
If you're running Gridlight for a team or in production, change the default API token (dev-token) to something unique and secure.
Memory System
Gridlight can remember things about you across conversations. Teach it your preferences, your role, your project context — and it'll use that knowledge to give you better, more personalized responses.
- Facts — "I work at Acme Corp" or "My preferred language is Python"
- Preferences — "I prefer concise answers" or "Always include code examples"
- Context — "I'm working on a React project called Dashboard Pro"
Memories can be permanent or set to expire after 24 hours, 7 days, or 30 days. And everything stays local — your memories never leave your machine.
You can view, manage, and delete your memories at any time. You're always in control of what Gridlight remembers.
GRIDLIGHT Chat
Overview
Gridlight Chat is the primary way you interact with AI in Gridlight. It's a full-featured conversational interface that supports multi-turn dialogue, file uploads, image generation, knowledge base queries, and persistent memory — all running locally through your Gridlight gateway.
Open Gridlight Chat from the app library or click Chat in the main navigation. On first launch you'll be prompted to set your name for personalized responses.
Conversation Modes
Gridlight Chat has multiple conversation modes, each optimized for a different task. Switch modes using the mode selector button near the input area.
| Mode | What It Does | When to Use It |
|---|---|---|
| Chat | General multi-turn conversation with context awareness. Maintains up to 20 turns of history. | Everyday questions, brainstorming, writing, coding help |
| Context (RAG) | Queries your knowledge base using Gridlight's RAG pipeline — vector search, reranking, and LLM generation in one call. | Searching uploaded documents, asking about your data, getting answers with source citations |
| Image | Generates images from text prompts. Supports reference images, inpainting, style guides, and seed locking. | Creating concept art, illustrations, visual content from descriptions |
| Remember | Stores facts, preferences, and context about you for future conversations. | Teaching the AI about your role, projects, preferences, or any persistent context |
In Chat mode, the AI maintains conversation context across turns — you can ask follow-up questions using pronouns and it will understand what you're referring to.
File Upload & Training
Click the Upload Files button (or drag and drop files onto the chat window) to add documents to your knowledge base.
| Feature | Details |
|---|---|
| Supported Formats | PDF, DOCX, TXT, CSV, XLSX, and images |
| Multi-File Upload | Upload multiple files at once with parallel processing |
| Progress Tracking | Real-time progress panel shows status for each file: pending, processing, success, or failed |
| Spreadsheet Preview | CSV and XLSX files show a table preview before indexing |
| Retry | Retry failed uploads individually or all at once |
You can also add text directly to the knowledge base using the Memorize button — useful for pasting notes, meeting minutes, or any text you want the AI to reference.
Image Generation
Switch to Image mode and describe what you want. Gridlight Chat includes advanced controls for fine-tuning your results:
| Feature | Details |
|---|---|
| Quality Slider | Control inference steps (30–50) and guidance scale (7.5–9.0) with a single slider from Low to High |
| Style Guide Builder | Fill in subject, art style, mood/lighting, and camera angle fields — then click "Add to Prompt" to assemble a structured prompt |
| Reference Images | Upload a reference image and choose Redraw (use as composition guide) or Style Match (copy the art style) |
| Inpainting | Paint a mask over specific areas of an existing image and regenerate just those regions. Includes brush and eraser tools. |
| Seed Locking | Lock the seed value to get reproducible results. Reuse seeds from previous generations. |
Generated images appear inline in the chat with metadata (model, seed, guidance scale). Click "Use as Reference" on any image to feed it into your next generation.
Memory & Personalization
Gridlight Chat remembers who you are across sessions. On first launch it asks for your name, then uses it to personalize responses. You can teach it more using Remember mode:
- Facts — "I'm a frontend developer at Acme Corp"
- Preferences — "I prefer concise answers with code examples"
- Context — "I'm working on a Next.js e-commerce project"
Memories are stored locally through the gateway and used automatically to improve response quality. Use the Save & New Chat button to save the current conversation summary to memory before starting fresh.
Search & Knowledge Base
In Context (RAG) mode, Gridlight Chat searches your knowledge base using a hybrid approach — combining vector embeddings, keyword matching, and reranking to find the most relevant information. Results include source citations so you can verify answers.
You can also index local folders by granting file system access — Gridlight will recursively scan and match files by relevance, including their content in your queries (up to 50KB per query).
Connection & Settings
Click the Connection button to configure:
| Setting | Description |
|---|---|
| Gateway URL | Your Gridlight gateway address (default: http://localhost:8080) |
| API Token | Authentication token (default: dev-token — change this in production) |
| Test Connection | Pings the gateway health endpoint to verify connectivity |
| License Status | Shows your current license status and plan |
Keyboard shortcuts: Enter to send, Shift+Enter for a new line, and M (hold) for push-to-talk voice input.
GRIDLIGHT Games
Overview
Gridlight Games is a retro neon arcade featuring 9 AI-powered games. Every game pits you against an intelligent AI opponent with adjustable difficulty — from forgiving ("Easy") to relentless ("Savage"). Your progress, XP, and achievements persist across all games through a unified player profile.
Open Gridlight Games from the app library. On first launch a player profile is created automatically (no account needed). Click any game tile on the arcade menu to start playing.
Available Games
| Game | Description | How to Win |
|---|---|---|
| Chess | Classic chess with full legal move validation, check/checkmate detection, and an optional hint system | Checkmate the AI opponent |
| Neon Battle | Naval combat (Battleship-style) with turn-based firing and probability-based AI targeting | Sink all enemy ships before yours are sunk |
| Poker | Texas Hold'em with full betting rounds (preflop, flop, turn, river) and AI bluffing | Take all of the AI's chips (1,000 starting each) |
| Crossword | Procedurally generated word puzzles with keyboard navigation and a limited hint system | Fill the entire grid correctly |
| Trivia | Timed multiple-choice questions across 5 categories: Science, History, Geography, Entertainment, Sports | Score 60% or higher with streak bonuses for consecutive correct answers |
| House of Suspects | Murder mystery deduction game — investigate locations, interrogate suspects, and make accusations | Correctly identify the culprit through strategic deduction |
| Gridlock | Connect Four on a 6×7 grid with animated drops | Get 4 in a row before the AI |
| Neon Drift | Tron-style top-down racing with light trails, boost and shield abilities, and 3 AI opponents | Be the last racer standing |
| Market Mayhem | Stock trading simulation with 100+ stocks, advanced order types (market, limit, short, options), and AI-driven news events | End 30 simulated days with a higher portfolio value than the AI trader |
Player Profile & Progression
Every game you play earns XP. Higher difficulty levels multiply your rewards:
| Difficulty | XP Multiplier |
|---|---|
| Easy | 0.5× |
| Normal | 1.0× |
| Hard | 1.5× |
| Savage | 2.5× |
Base XP: 100 for a win, 50 for a draw, 25 for a loss. Playing daily builds a streak bonus (+10% per day, up to 2× multiplier). As you level up you'll unlock titles — from Newcomer (level 1) all the way to Immortal (level 30+).
There are 24 achievements to unlock: cross-game milestones (first win, 3-day streak, all-rounder), plus per-game achievements for 10-win milestones, speed runs, and perfect games.
AI & Settings
| Setting | Options | Description |
|---|---|---|
| Difficulty | Easy, Normal, Hard, Savage | Controls AI strength, timer lengths, and hint availability |
| AI Persona | Friendly, Trash Talk, Tutor, Silent | Changes how the AI comments during games — encouraging, taunting, educational, or quiet |
| Sound | On/Off, Volume (0–100%) | Toggle sound effects and adjust volume globally |
The Tutor persona is great for learning — it explains your mistakes and suggests better moves as you play.
GRIDLIGHT App Builder
Overview
The Gridlight App Builder is a visual, no-code application builder that lets you create fully functional AI-powered web apps by dragging and dropping components. It includes 57+ components across 10 categories, 11 layout templates, 18 theme presets, and AI-assisted app generation — all without writing a single line of code.
Open the App Builder from the app library in Gridlight. You can also create a new dev app from the Apps tab by clicking New Dev App.
Creating an App
There are several ways to start:
| Method | How It Works |
|---|---|
| Start with a Layout | Pick from 11 layout templates (Chat, Dashboard, Sidebar, Split, Hero, Documentation, etc.) then drag components onto the canvas zones |
| Build with AI | Click "Build with AI" and describe your app in plain English. Review the generated page, then Accept, Regenerate, or Refine. |
| Use a Template | Choose from pre-built templates: SaaS Dashboard, E-commerce Store, Blog, Portfolio, Support Portal, Admin Panel, Landing Page, AI Chat App, Documentation Site |
| Import HTML | Paste or upload existing HTML and the builder converts it into a component-based structure |
The Builder Interface
The builder uses a three-panel layout:
| Panel | What's Inside |
|---|---|
| Left Panel | Pages — manage multi-page apps (add, rename, delete pages). Layouts — 11 templates with visual previews. Components — all 57+ components organized into collapsible categories, ready to drag onto the canvas. |
| Center Canvas | Your app's live preview. Drop zones highlight when dragging components. Toggle between Desktop (900px), Tablet (768px), and Mobile (375px) views. |
| Right Panel | Context-sensitive configuration. When a component is selected: properties, data bindings, conditional rules, validation, and responsive styling. When nothing is selected: app settings and theme. |
Components
57+ components organized into 10 categories:
| Category | Components |
|---|---|
| Gridlight Endpoints | Neon Query (RAG), Intelligent Chat, File Upload, Text Training |
| Display | Response Display, Chat Messages, Status Badge, Tabs, Accordion, Grid Container |
| Interactive / Forms | Input+Send, Dropdown, Auto Textarea, Checkbox Group, Chip Buttons, Quick Actions, Search with Filters, Rating, Toggle Switch |
| Static | Hero, Image, Heading, Text Block, Button, Code Block, Divider |
| Data Visualization | Data Loader, Metric Card, Bar Chart, Line Chart, Pie Chart, Data Table |
| Containers | Modal, Card Grid, List, Grid Container |
| Navigation | Nav Bar, Sidebar Nav, Breadcrumbs, Footer, Stepper/Wizard, Pagination |
| Authentication | Login Form, Signup Form, Password Reset, User Menu |
| AI | Content Generator, Chat Widget, Smart Search, Summary Card, Document Q&A, Form Filler, Data Insights |
| E-commerce | Product Card, Product Grid, Shopping Cart, Checkout Form, Order Summary, Stripe Payment |
To add a component, drag it from the left panel onto a drop zone on the canvas. Click any component to configure its properties in the right panel — text fields, toggles, JSON arrays for list-based options, and number inputs are all available depending on the component type.
Data Binding
Data bindings let you connect components together so they react to each other in real time. When one component's value changes, all bound components update automatically.
To create a binding: select the target component, find the Data Bindingssection in the right panel, click + Add Binding, then configure:
- Source Component — which component provides the data
- Source Property — what property to read (value, text, etc.)
- Target Property — what to update on this component
- Transform (optional) — a JavaScript expression like
value.toUpperCase()
You can also set conditional rules (show/hide, enable/disable) and form validation (required, email, URL, min/max length, regex patterns) from the same panel.
Themes & Styling
The App Builder includes 18 built-in themes (light and dark variants). Select a theme from the right panel when nothing is selected on the canvas.
| Theme Category | Options |
|---|---|
| Dark Themes | GRIDLIGHT (default), Midnight, Sunset, Coral, Neon |
| Light Themes | Light, Ocean, Forest, Elegant, Rose, Minimal, Modern |
Click Custom to define your own colors (primary, secondary, background, surface, text) and typography (font family selection or custom Google Fonts URL). You can also set a background image. Responsive overrides let you customize padding, width, and visibility per device breakpoint (Desktop → Tablet → Mobile).
Workflows & Automation
Workflows let you add logic without code. Click Workflows in the header, then either describe what you want in plain English ("When the form is submitted, show a success notification") and let the AI generate it, or build manually.
| Triggers (When) | Actions (Then) |
|---|---|
| Form Submitted | Show Notification (toast message) |
| Button Clicked | Navigate to URL |
| Page Loaded | Set Value (update variable) |
| Data Changed | Show/Hide Component |
| Component Value Changes | Call API / Save to Gridlight |
| Scheduled (Cron) | Run Custom Code (JavaScript) |
| Webhook Received | HTTP Request, If/Else, Loop, Wait/Delay |
Export & Publishing
When your app is ready, export it in the format you need:
| Format | Description |
|---|---|
| Standard HTML | Single self-contained .html file with all CSS and JavaScript included. Download and share immediately. |
| Runtime HTML | Standalone app with Gridlight runtime APIs (AppBindings, AppRules, FormValidation). |
| PWA Package | Progressive Web App with manifest, service worker, and offline support. Installable on mobile and desktop. |
| .glapp Package | Gridlight marketplace format. Includes your manifest, compiled app, and runtime. Ready for marketplace submission. |
| Project Files | Full directory structure with gridlight.json, src/ folder, and app.json. Ready for version control and custom development. |
| Semantic HTML | Accessible, SEO-optimized output with ARIA labels and semantic tags for better screen reader and search engine support. |
To publish to the Gridlight marketplace, export as .glapp and fill in the required metadata (name, version, author, description, icon). Users can then install your app directly from the marketplace.
Troubleshooting
Running into issues? Here are solutions to the most common problems. If you don't find what you're looking for, check the Getting Help section below.
License Issues
| Problem | Solution |
|---|---|
| Activation code not accepted | Double-check for typos — the format is XXXX-XXXX-XXXX-XXXX-XXXX. Make sure you're copying the full code from your confirmation email or license dashboard. |
| License file won't upload | Download a fresh copy from license.gridlight.ai. The file may have been corrupted during download. |
| "License expired" message | Your license may be in its 7-day grace period or fully expired. Log in to the licensing portal to check your status and renew. |
| Can't log in after activation | Make sure you're using the same email and password from the licensing portal — not a different account. Try resetting your password if needed. |
| Gateway not connecting | Gridlight sends periodic heartbeats to verify your license. Check your internet connection and ensure no firewall is blocking outbound connections to our license servers. |
Installation Issues
| Problem | Solution |
|---|---|
| macOS: "App can't be opened" | Go to System Settings → Privacy & Security and click "Open Anyway." This happens because Gridlight isn't distributed through the Mac App Store. |
| Windows: installer blocked by SmartScreen | Click "More info" → "Run anyway." Windows SmartScreen may flag new applications that haven't built up a reputation yet. |
| Linux: AppImage won't launch | Make sure the file is executable: chmod +x Gridlight-*.AppImage. If you're on a Wayland session and see display issues, try launching with --ozone-platform=wayland. |
| App opens but shows a blank screen | Try clearing the app cache and restarting. If the issue persists, check that your GPU drivers are up to date — this can affect the app's rendering. |
Performance Issues
| Problem | Solution |
|---|---|
| Model responses are very slow | Try a smaller model (7B instead of 13B or 32B). Check that you have enough free RAM — LLMs need the full model loaded in memory. Closing other memory-heavy apps can help. |
| Image generation takes too long | Image generation is GPU-intensive. If you're running on CPU only, expect longer generation times. Consider reducing the output resolution or step count. |
| App using too much memory | Reduce the number of CPU threads in Settings, or switch to a smaller quantization (Q4 instead of Q8). You can also unload models you're not currently using from the Models tab. |
| GPU not being detected | Make sure your GPU drivers are up to date. Gridlight supports NVIDIA (CUDA), AMD (ROCm on Linux), and Apple Silicon (Metal). Check the Monitor tab to verify GPU detection. |
Getting Help
Still stuck? We're here for you:
- Discord community — Join our Discord server for real-time help from the team and other users.
- Developer documentation — Building apps? Check out the Developer Docs for API references, component guides, and more.
- Email support — Reach us at support@gridlight.ai for account, billing, or technical issues.
- Release notes — Check the latest release notes to see if your issue has been addressed in a recent update.